How to Repair a Cork Ttile Floor
 Welcome to our guide on how to repair a cork tile floor. This guide was designed to help educate the average homeowner on how they can repair their damage cork floor on their own. If you have a cork floating floor this isnt the right repair guide for you, youll need to read the how to repair a floating cork floor guide. If you have any questions regarding this repair guide feel free to contact us. We recommend that only homeowners with some do-it-yourself experience in home repair attempt to repair their tile cork floors.
Tools & Materials Required
- Utility Knife
- Rubber Mallet
- Chisel
- 24 Straight Edge Ruler
- 4 to 6 Razor Scrapper
- 2 to 4 Painters Brush
- Sand Paper
- Tile Adhesive (Use manufacturer recommended glue)
Cork Tile Removal Process
- Remove any furniture or items away from the damaged cork tile. This will make it easier to work without items in your way. If the damaged tile is along a baseboard youll need to remove the baseboard.
- Locate the seam on all 4 sides of the damaged cork tile. You will need to cut into that seam, about half the tiles thickness using your utility knife and straight edge ruler.
- Youll now need to use your utility knife and cut out a square in the middle of the damage tile; make sure the square is about an inch inside the damage tiles seam.
- Youll now slowly want to use your chisel and rubber mallet to tap out the middle cutout square. The trick is to do this without damaging the surrounding cork tiles. You might need the help of a heat gun if the adhesive makes this task difficult, the heat gun will help loosen up the adhesive, but make sure not to burn the tile or the sub-floor.
- Once youve gotten out the square from the middle you can finish the outer seam cut to the sub-floor and use the chisel and mallet to remove the remaining pieces of the tile.
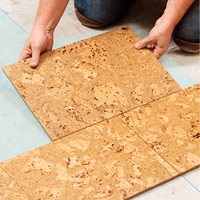
Cork Tile Installation Process
- Now that the damaged cork tile(s) have been removed its time to prep the sub-floor. Start from the center and use your razor scrapper and work your way out to the edges of the surrounding tiles.
- After youve scraped up as much of the old adhesive as possible you want to use your sand paper and smooth out the sub-floor. Its important to clean up all the debris and foreign objects to have a clean smooth surface to install the cork tile on. If you need to use a leveling compound to even out the sub-floor.
- Once youre ready you will need to trim your cork tile to size so it can be used to replace the old tile. The cork tile should fit in tight and firmly, but not buckle in the middle. Remember, measure twice and cut once.
- Once youve trimmed the tile to size you are ready to apply your adhesive. Youll want to apply the adhesive to the floor and the cork tile. Follow the directions of the adhesive for proper installation instructions using that product.
- Install the cork tile after following the directions of the adhesive and use your rubber mallet to secure it in place. Do not walk on the tile or place any furniture on it for at least 24 hours.